

Last weekend I got fed up and decided it was high time to replace the miniscule 79G hard drive in my 15″ MacBook Pro, purchased in 2006. I did realize that hard drive replacement on this Mac is a warranty-voiding procedure, but that’s ok since the Mac is out of warranty and out of AppleCare care.
I’ve done the web search for ‘replace macbook pro hard drive‘ before, so I understood the need for tiny Philips screwdrivers and the special tiny-star pattern screwdriver (called a Torx T-6). I have been a regular user of TimeMachine, which was introduced in Mac OS X 10.5 Leopard and thought I could rely on that capability for the post-installation software part of the process. I went hard drive shopping on Sunday morning at my local BestBuy and found myself the proud owner of a Seagate 500G 5400 RPM hard drive for under $130.
The process is a mechanical process – open the machine, remove the 79G drive, install the 500G drive, reassemble the machine, install the 79G drive in the 500G package – and a software process. All the websites talk about the mechanical process, but it was the software process, I call the ‘soft side’ that really chewed up my week’s productivity and frustrated me enough to document this post so hopefully other users can avoid the agony I suffered.
Couple things I didn’t know but wished I knew:
- Any process typically involves the transfer of a large amount of data requiring several hours to transfer so make sure you’re absolutely sure it’ll work or you’ll be spending lots of hours just waiting to discover that it didn’t.
- Hard drives out of the box aren’t usually formated for GUID (required for Mac OS boot disks – did you know that?).
- You should NOT waste your time trying to copy all the data from the small drive to the large drive and then expect it to work right away. I did this as a ‘prepare to replace macbook pro hard drive’ step. Waste of time.
- Not all Mac system DVDs work on all Macs. My son’s newer MacBook system DVD wouldn’t install with my MacBook Pro Intel Dual Core (not the same as an Intel 2 Dual Core) processor and kept refusing to do so. Likewise, the 10.5 Leopard system disks that came with our Mac Mini wouldn’t install, so I felt compelled to install the original Tiger (OS X 10.4) system. WASTE OF TIME since 10.4 doesn’t support TimeMachine.
- Have a set of system DVDs for the Mac OS you intend to use ready to go. I had to go to my local Mac retailer who had the last retail copy of Leopard in a 25-mile radius (according to BestBuy’s online availability map) and pay for the disk even though Snow Leopard is due out in six weeks. 🙁
Soft Side Processes in Replace MacBook Pro Hard Drive
Do the mechanical processes described in all those websites. Make sure you don’t have screws left over. I did the first time and then remembered they were to screw the drive down to the system below the bluetooth electronics module, so I opened it up and got all the screws in the right places.
Startup the machine with the Leopard DVD, press the C key during the initiation process. The computer should give you a welcome to Mac OS X movie and start with what language option.
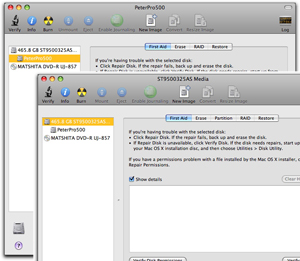 Now we have to format the new drive properly. There is a disk utility menu option at the top. Choose it. Here, selecting the upper drive reference widens the menus to show a Partition option. Here, select the partition where you can choose 1 partition if you want, and then select options to get the all important GUID Partition Table option. I must have spent an hour trying to figure out why my shiny new 500G hard drive couldn’t be a system.
Once the hard drive is correctly formated, you can now install the new OS on it. This will take a few hours since the process will first want to verify that the DVD is not corrupted. Sigh.
Then it will copy the files and expand them on your hard drive. Oh, and there’s a second DVD that has to be inserted and installed too.
When complete, you are asked to restart the Mac which should start up with a Mac OS X movie and the language selection to be installed.
Now, it’s a good thing that you put the 79G drive into the 500G package. That way you can use the USB cable to connect it to the computer too. The installation process will ask you if you have an other computer to upgrade from and you should say yes, pointing to the 79G drive. That way some of your preferences and stuff will be uploaded properly.
After that initialization, I opened up the 79G drive and copied Applications into Applications, Library into Library and cracked up users and my name, copying Library into users/my_name/Library. I rebooted the computer and my dock was on the left (where I had left it), mail required me to import my new files, but after that it worked as before.